Wednesday, August 31, 2011

Another 650???

I couldn't resist myself. A co-worker pointed out this 1975 XS650 in poor shape on craigslist. For two hundred dollars I couldn't say no. Of course it wasn't running when I purchased it. But a little time spent on it over the weekend and she was running in no time. It still needs more attention, but now its got a new lease on life. The instrument cluster will need some work since its a jumble of wires right now. Headlight and turn signals will also have to be checked out as those don't work either.

Anyway here's a shot of ugly betty in the driveway.


Someone was hardcore and put the 10" mini-ape handlebars on lol. I think someone also removed the baffles in the exhaust because she has a rough sound to her.

Here's a vid of me kicking her over:


Tuesday, August 23, 2011

The Engine is coming along

Have a look at the video. I was able to install the cylinders and the lower half of the top end over the weekend.


Monday, August 8, 2011

Fun With Digital Calipers and a Burned Out Clutch

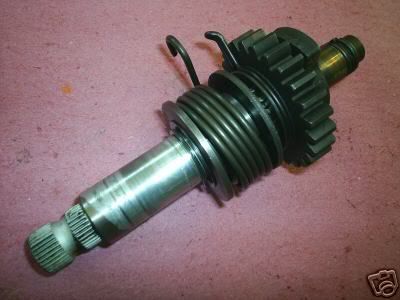
While I'm waiting for a set of piston rings I decided to examine the clutch and kick starter. Lets just say I had a lot better luck with the kick start assembly than I did with the clutch.

The kick start assembly is fairly basic with the shaft, washer assembly, main gears, and return spring. There are some other parts in there that I wont go into detail about but luckily the previous owner did not disassemble the shaft assembly itself so reassembly was fairly simple.


The return spring sits approx half way on the shaft and needs to be "wound" during assembly. I found some material on an xs forum where someone used a zip tie to rotate the spring around and wind it up. I used the same method but substituted with a piece of rope.Installation was a breeze it took maybe 2 attempts and 20min of my time.

Disassembling the clutch wasn't something I wanted to do, but it was necessary to inspect the clutch plates and check for wear.


Upon inspection with my digital calipers I realized I'm outside the tolerance for operation. Have a look below:


The accepted tolerance for clutch plates are in the range of 3.5mm to 3.1mm only a 0.122 difference
 and my plates are averaging 2.85 (not good). Somebody was riding this clutch hard...

Tuesday, August 2, 2011

Had some time tonight to work a little on the pistons. From the image you can see the cleaned version on the left and the uncleaned on the right. Why am I doing this?? Would you use a dirty mop to clean your floor? NO of course not, that's why these pistons need to be clean so they can perform at their maximum potential! I will inspect the rings and their gap and clearance in the cylinders after they are cleaned. From my measurements I can determine whether to replace the rings or use the stock set.


I don't have access to a ultrasonic cleaner or a parts cleaner, so I am using Simple Green. Its a great method for cleaning carbon deposits from the head of the piston, have a look:

Sunday, July 24, 2011

Lower Engine Success

Assembling the lower half of the engine went well. I used a liquid gasket that sealed the two halves together and using a torque wrench I was able to maintain the factory 14 ft lbs of torque per bolt. Have a peek at the video I explain a little more there:


Moving on up indeed. Next step will be to hone the cylinders, clean the pistons, and continue working up the engine.

Monday, July 18, 2011

Bobber Inspiration

I have decided exactly how my bike will look from my vast knowledge of motorcycle styles and designs (sarcasm). But mostly from perusing the internet for hours upon hours drooling at other project bikes. Here are a few xs650s that I find very well made and rather good looking to boot:


Obviously I'm a fan of all of these bikes, but I'll let you in on my personal tastes. I'm planning on (trying) the 10" mini apes (handle bars). It gives the bike a much straighter stance and leads the eye from the top of the bars down to the rear wheel. I'm also hot to trot on fat white wall tires and a Harley style sportster gas tank. The original tank is simply to elongated and wide. As far as the front end goes I will have to stick with the stock forks as most aftermarket front ends are simply to costly.

My personal favorite:

Sunday, July 10, 2011

Lower Engine Case Wrap Up

All of the lower engine case mechanics have been transferred over to the (good) case. I go into a little more detail on what was done in this video:


Here is a completed closeup view of the side of the shifting mechanism:


Exploded view of the shifter shaft assembly:


Next step will be to use liquid gasket to seal both halves of the engine case together. I will be picking up a torque wrench or rent one depending on the price. I need this wrench for torquing all case bolts to 14ft lbs of pressure to ensure a proper seal. Stand by for case assembly. :)